There’s almost nothing more frustrating than getting all set up to pump and then having a problem getting the pump to function properly. Narrowing down the problem to the right spare part and replacing it takes up valuable pumping time and ups your stress level — not optimal for milk making and letting down!
We’ve found the following steps to be the quickest way to diagnose the troublesome part, and provided some examples of parts that have come back to us, showing wear and tear. In general, expect to replace parts about every 12-16 weeks, depending on how often you use the pump and how you wash the parts.
The flanges, storage containers and duckbill valves are dishwasher safe, but it extends their life to hand wash with hot, soapy water. Microwaving in bags, the hot temps of most dishwashers and boiling decreases the life of any plastic product, so unless you have a reason to go the extra mile with cleaning (baby in the NICU, etc.) we recommend hand washing. If you have questions, the FDA’s guide to cleaning breast pumps is here. Never wash your filter! Your tubing only needs to be washed if you have gotten milk in it or have condensation build up.
Diagnose the Filter
Damaged Filter
First, lay your pump on its back, with the knobs facing the sky, and remove the filter (and the flanges, etc.). Turn the pump on high speed and high suction and listen to the pump. If it sounds normal, turn it off and inspect your filter. If the pump is making a strange noise or doesn’t sound normal at this point, give customer service a call at 714-515-7571 x 1. If you’re not sure about how the pump sounds, go ahead and let it run for 5-10 minutes.
If you have gotten condensation in your tubing, or had milk back up into the tubing, check your filter carefully for moisture. If your filter has become wet, it needs replaced immediately. If your filter has become damaged, it also needs replaced. Moms who live in humid climates should also pay special attention to their filters. If your pump is constantly damp from humidity, it may need to be replaced more often than usual.
Condensation in Filter
Your pump filter works in much the same way as the filter on your vacuum cleaner. It’s a barrier to keep dust (and milk or condensation) from going into the pump motor unit. If it becomes clogged with dust, it can’t let the air through efficiently and you will experience problems with the pump. If it’s been a while since you changed the filter, try a new one, that’s often the cause of a pump that starts acting up sporadically.
With a new filter on the pump, turn it on again at high speed and high suction (no tubing or flanges yet) and listen to the pump. It should sound the same as it did without the filter. If your pump sounds fine at high speed and high suction with a new filter, go ahead and try to pump. Hopefully that was an easy fix! If you’re still having trouble with suction, move on to testing the other pieces of your accessory set.
Diagnose Your Duckbill Valves
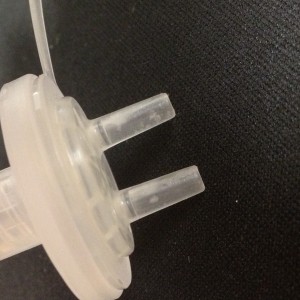
Torn Duckbill Valve
Your duckbill valves are vital to pump suction. They are also the spare part that you’ll probably have to replace the most frequently, and sometimes a tear isn’t easy to see.
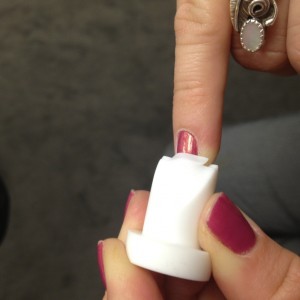
You will reduce the risk of damaging your valves by cleaning them gently, and by not putting them in the dishwasher. There are special (very soft) little brushes available for cleaning breast pump parts, but you can also get them clean easily if you wash them first while attached to the flange, running hot soapy water through them as you wash the flange. Then, remove them from the flange and remove any additional milk buildup gently. Never put your finger through the valve (as shown in the picture to the left) to clean the valves, this causes tearing.
- First, be absolutely sure that your duckbill valves are seated firmly in both flanges. They fit very firmly, so double checking them can save a lot of time for a simple fix. The round end of the duckbill valve is the end that goes into the flange.
- If they are seated correctly, remove them and make sure they open easily by squeezing the sides together. Look for any tears and make sure that they open easily.
- Inspect them carefully for small tears. Even a small tear will cause loss of suction.
- If it’s been several weeks since you’ve changed the duckbill valves, do it now and see if that resolves the issue. If not, replace them in the flanges and move on to diagnosing the accessory set.
Quick Diagnose Your Accessory Set
It’s often easy to figure out which side of your accessory set has a bad part or isn’t fitted together correctly by testing one side at a time.
- Separate the flange sets (flange, tube, valve) into right and left sides.
- Put the cap on the filter to set up for single pumping.
- Hook up one flange set to the filter.
- Turn the pump back on at high speed and high suction, and press the flange against your abdomen. DO NOT TEST ON YOUR BREAST. Note how far your abdomen is pulled into the flange. Your abdomen won’t be pulled into the flange nearly as far as your breast, but you can make a note and then repeat these steps with the other flange set.
- Repeat with the other flange set. If you started with the left set, now do the right, etc.Note: You need to make a tight seal with the breast shield against your abdomen, push firmly if necessary.
Did you notice a difference in how far one flange set pulled your abdomen into the flange? If so, the side that wasn’t pulling your skin into the flange is likely the culprit. Check each piece of that set carefully, looking for wear or damage or tearing on each piece.
If both sides pulled your abdomen into the flange equally (or not at all), move on to testing each piece individually.
Diagnosing Your Tubing

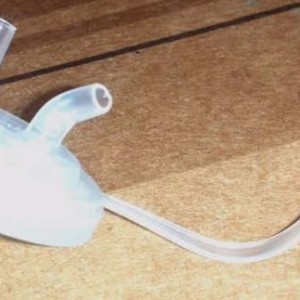
Ripped Tubing
The tubing for your Hygeia Personal Accessory Set is very durable, and it can be easy to miss little signs of wear and tear. Common signs that your tubing is losing suction somewhere are:
- Condensation in the tubing when you’ve never had a problem with that in the past
- A whistling or whining sound from the pump or accessory set
- Intermittent problems with suction
- One tube at a time, hook up the tubes to your filter (with the cap on the filter for single pumping) and turn the pump on high speed and high suction.
- Is there suction coming from the tube?
- Do you see any holes, damage, kinks or signs of wear?
- If your tubing is crimped, that will also cause problems. Common causes of crimping include leaving the tubing attached to the pump during transport/use.
- Is the orange connector firmly attached to the tube?
- Is the clear end (that attaches to the filter) connecting firmly to the filter or has it stretched out over time?
Repeat with the second tube. If you need to replace your tubing, do it now and try pumping to see if that has fixed the problem. If not, move on to your flanges.
Diagnose Your Flanges
- Check to make sure that your flange has not become misshapen over time (usually because of dishwasher heat and/or boiling).
- Over time, the hole where the orange end of the filter attaches can also become worn and lose suction.
- Your breast may change shape/density over time, and you might need a different size flange than when you first started using the pump.
- If you pump one side at a time, and notice a difference in suction between the two sides, and you’ve checked everything else, it’s time for a new flange.
Call our Customer Care department at 714-515-7571 x 1 if you need any help when you’re troubleshooting or if you’re unable to resolve your issue — we’re happy to help!